Anyways. My trusty oven was full of cakes baking this morning. I knew (I KNEW) I should have made a batch of pan coat before starting. If there's one thing I
What is pan coat? Well. It's that stuff that coats the pan to keep cakes from sticking. Before I worked for Mary Sue, a talented caterer and cake-maker (ooooooooo! now SHE does roses!!!) I didn't even know the stuff existed. I had always greased and floured the cake pans the old way. About the time the oldest son was born Baker's Joy was discovered on the grocery store shelf. Ohhhh JOY! I fairly loved the ease of use despite its pricy-ness. Mary Sue had a Tupperware canister full of pasty flour-y greasy stuff she used in the cake pans, applied with a paper towel. One afternoon I watched Ollene pull the recipe and make it. Hmmmmmmm....
A couple of years ago I started making cakes and remembered the pan coat. A quick Google search revealed the recipe. They're all basically the same; I've tweaked mine just a bit. I don't care for the oiliness found in using the 1 to 1 ratio of oil to shortening to flour.
I almost thought of the camera too late this morning. It's not a properly documented tutorial but, ehhh, you're reading this... Hey hey Booboo! Smmmmmarter than the average bear!
I've always used the Cuisinart but Mama uses her mixer and it's almost the same consistency. You'll need oil, shortening, and flour. I was out of plain flour and used self-rising. I don't know if one or the other makes any difference here; I've never known it to. That doesn't mean it won't -- just that I haven't experienced it yet (yet??).
Martha White: MmmMMM GOOD! I like Martha White Flour and a lesser known brand called Sunflower.
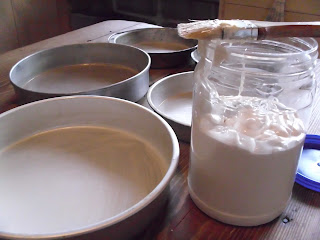
Put all the ingredients in the processor and let it run until very smooth. I like to use a paintbrush to coat the pans with. Don't spend a lot of money on a fancy pastry brush, this one from the Dollar General store works as well and lasts as long. They'll eventually start losing bristles from all the constant use and washing, but that's alright, too. Throw it away and get another. There's not a whole lot of investment in it.
Put the pan coat in a container with a tight fitting lid. I store mine down in the cabinet; it gets used fairly quickly around here. If you make a batch and don't bake often, put it in the refrigerator to keep for several months. Even in the refrigerator, the oil and shortening will eventually go rancid. Ewwwww...nasty.
That's a big pickle jar in the photo with approximately four and a half cups of pan coat in it, the yield from this morning. Adjust the amounts up or down to suit your need. Again, most recipes online have equal amounts of all three ingredients. OOOOooooo... and if it's close to the holidays and coconut cake season? by all means, use coconut oil in it! Drop the baking temperature by 25 degrees if you do; I've had coconut oil scorch because of its lower flash point. That was nasty too...
Here's the recipe used today:
Pan Coat
1 1/2 cup vegetable oil
2 cups vegetable shortening
2 cups flour
Mix all together until smooth with your favorite implement of combining ingredients.
You'll never buy another can of Baker's Joy now; this is so easy and cost effective. Y'all break out your favorite cake recipe and pans and try it out!


Do you get a nickel for every dollar you helped me save? thanks again CUZ for the neat budget saving tips.
ReplyDeleteI think your cuz should start giving you a nickel for every dollar you help them save (hehehe). Sorry, saw that and couldn't help myself.
ReplyDeleteHere's my "for real" comment....
Thank you, thank you, thank you! Me and Baker's Joy were about to have a fight. The last TWO times I've bought a can, the sprayer has not worked right from the first spray. I wouldn't have been so upset, but that stuff is expensive! I went back to shortening and flouring the old fashioned way. I used Baker's Joy pretty much every time I cooked because I always make some kind of bread with our meals so now I'm excited. I've got a pickle jar I've been saving and now I know why :)